Cool Science Experiments Headquarters

Making Science Fun, Easy to Teach and Exciting to Learn!

Science Experiments

Magic Milk Science Experiment – Amazing Explosion of Color!

Did you know that it is easy to turn ordinary milk into a rainbow of crazy colors? With only four common kitchen items, kids are thrilled by the color explosion created by the hydrophilic and hydrophobic molecules in our magic ingredient!

Watch our demonstration video, then print out a materials list and instructions to plan for this simple and fun science experiment. Easy to understand explanation of how it works is included below.

cool magic milk experiment

JUMP TO SECTION: Instructions | Video Tutorial | How it Works

Supplies Needed

  • Milk (Must be either Whole or 2%)
  • Food Coloring. The more colors the better
  • Shallow Dish or Bowl

Magic Milk Science Lab Kit – Only $5

cool magic milk experiment

Use our easy Magic Milk Science Lab Kit to grab your students’ attention without the stress of planning!

It’s everything you need to  make science easy for teachers and fun for students  — using inexpensive materials you probably already have in your storage closet!

Magic Milk Experiment Instructions

cool magic milk experiment

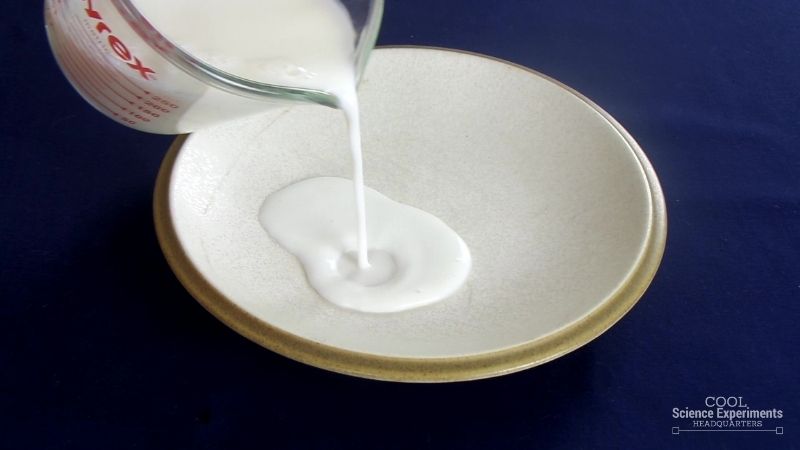
Step 1 – Pour some milk into a shallow dish or bowl until the milk covers the bottom.

cool magic milk experiment

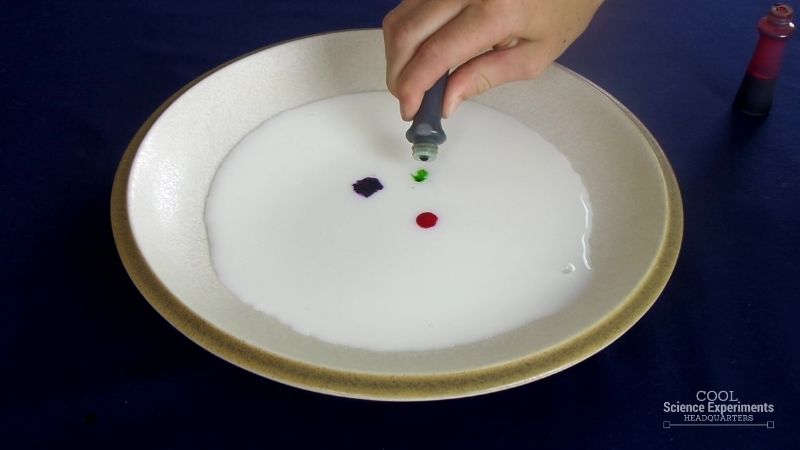
Step 2 – Add some drops of food coloring on the milk. You can use a variety of colors, just be sure to add 3-4 drops of each color.

cool magic milk experiment

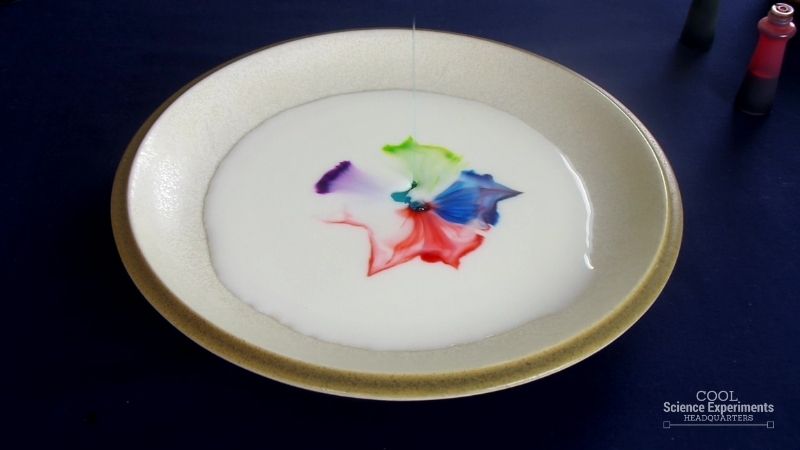
Step 3 – Add a drop of dish soap into the center of the milk.

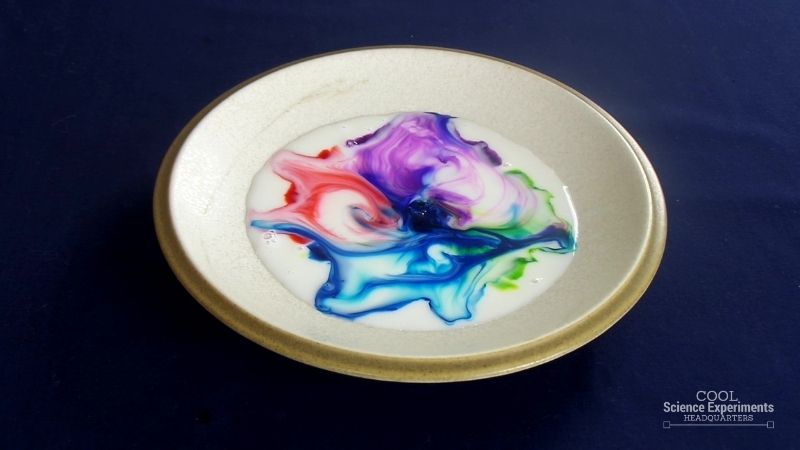
Step 4 – Watch in amazement as the colors dances across the surface of the milk. Do you know what caused the colors to move around in the milk? Find out the answer in the how does this experiment work section below.

Video Tutorial

Detailed Magic Rainbow Milk Science Experiment Step by Step Instructions

How Does the Science Experiment Work

The key to the dancing colors in this experiment is soap! Soap molecules consist of a hydrophilic (“water-loving”) end and a hydrophobic (“water-fearing”) end. Water molecules are polar molecules that can dissolve other polar molecules. Fat (and oil) molecules are nonpolar molecules, so they cannot dissolve in water.

Milk is a mixture of water, fat, vitamins and minerals. When soap is added to the milk, it helps to separate the water and fat in the milk. When soap is mixed in with the fat and water, the hydrophobic end of the soap molecule breaks up the nonpolar fat molecules, and the hydrophilic end of the soap molecule links up with the polar water molecules. Now that the soap is connecting the fat and water, the nonpolar fat molecules can be carried by the polar water molecules.

As the soap molecules connect to the fat molecules, the molecules of the food coloring get pushed around everywhere resulting in an explosion of color! As the majority of soap molecules attach to the fat molecules and the soap spreads throughout the milk, the color explosion will slow and eventually stop. Add more soap and see if there are more fat molecules that haven’t attached to soap – if there are unattached fat molecules still, the color explosion will begin again.

This experiment works best with 2% and whole milk because they contain more fat.

Other Ideas to Try

Try this experiment again using milk with different fat percentages. Try it with skim milk, 1% milk, 2% milk, whole milk, half and half, and cream. Consider even trying evaporated milk and sweetened condensed milk. See how the amount of fat affects the explosion of color!

I hope you enjoyed the experiment as much as we did. Here are some printable instructions:

Magic Rainbow Milk Science Experiment

Magic Rainbow Milk Science Experiment

Instructions.

  • Pour some milk into a shallow dish or bowl until the milk covers the bottom. Tip: Be sure to use either Whole or 2% Milk
  • Add some drops of food coloring on the milk. You can use a variety of colors, just be sure to add 3-4 drops of each color.
  • Add a drop of dish soap into the center of the milk
  • Watch in amazement as the colors dances across the surface of the milk

Magic Milk Science Experiment Steps

Reader Interactions

' src=

November 11, 2019 at 6:47 pm

I did this in my science class and it worked really well! I looked at a lot of science experiments but couldn’t find one I liked and then I found this at the last minute and it was really good so thank you for sharing:)

' src=

April 12, 2023 at 9:03 pm

I agree, Emma. It has worked every time and was fun to watch! This explanation of the experiment is very informative. I have done this experiment a lot when I was younger. ☺️

' src=

August 19, 2020 at 11:48 am

It was pretty cool

' src=

October 19, 2021 at 8:33 pm

This was a really fun activity!

' src=

November 19, 2021 at 8:26 am

Because of this experiment I got to the finals of my Sci Expo

' src=

February 13, 2022 at 8:11 pm

It was actually pretty cool. I did this for my science project. Also, the colors came out really nice! i will definitely try again.

' src=

April 2, 2022 at 5:27 am

Thanks a million for these fantastic ideas and explanations!

Leave a Reply Cancel reply

Your email address will not be published. Required fields are marked *

Save my name, email, and website in this browser for the next time I comment.

cool magic milk experiment

  • Privacy Policy
  • Disclosure Policy

Copyright © 2024 · Cool Science Experiments HQ

Living Life and Learning logo

Cool Magic Milk Experiment You Have to Try

Cool Magic Milk Experiment

A good magic trick is fascinating. And this is one cool magic milk experiment you have to try . It’s a mind-blowing trick that will excite your kids and get them interested in learning more about magic, science and art.

If you love this, you’ll enjoy my other simple homeschool science experiments !

I used simple household products to get this stunning effect. It’s so easy but the results are amazing. And this is one that can be done relatively unsupervised if you wish, because none of the products are dangerous to kids!

Though, personally, I love to see how it works just as much as the kids do.

Plus, you have everything in your kitchen right now to get started.

A cool magic milk experiment you have to try, with fun rainbow colors in milk in a bowl.

Start with some milk, preferably room temperature, some food coloring, cotton swabs, and a little dish soap. You’ll also need a shallow bowl with a lip or shallow container to hold the milk.

It doesn’t matter what colors you use, but contrasting colors will be more obvious, and coordinating colors will be more subtle. It all depends on the effect you want to see.

If you love this activity, you must try this Catapult STEM Activity with Popsicle Sticks .

The materials you need for this magic milk experiment on their plate: milk, food coloring, cotton swabs and dish soap.

This post may contain affiliate links meaning I get commissions for purchases made through links in this post. Read my disclosure policy here.

Why the Magic Milk Experiment Works

Contrary to what it looks like, milk isn’t just milk! It’s made up of mostly water, with a bit of fat in it, along with other nutrients — vitamins, minerals, proteins, etc.

The fat is in small droplets, held in solution in the water. That is, the fat molecules are suspended between the molecules of the water. And this fat (and the proteins) are super sensitive to changes in the milk.

The first stage of the magic milk experiment, with the food coloring dripped onto the milk.

When you first add the colors to the milk, they kind of “sit” on top of the milk. They might slowly spread through it, similar to paint spreading on paper.

They are held by the water tension in the milk, on the surface. So at first, it looks like not much happens.

Adding the dish soap to the milk in the magic milk experiment causes the colors to swirl

When you add the dishwashing liquid soap, that’s when things start moving — literally!

The soap molecules cause a chemical reaction that makes the colors mix together and moves around in the milk.

In fact, it’s not really the colors moving, but the food coloring that allows us to see the chemical reaction between the soap and the milk fat.

Check out the fun colorful patterns in the magic milk experiment.

What happens in the Magic Milk Experiment

The soap also lowers the surface tension of the milk, allowing the colors to mix and move about more freely. So for a bit, you’ll see everything move around and swirl, before finally settling.

It’s a lot of fun to watch!

At the end of the magic milk experiment, the colors are all mixed together and settling to the bottom.

The soap reacts with both the proteins in the milk and the milk fat molecule themselves. When the soap and proteins interact, the soap makes the proteins change shape, sending them swirling, which in turn makes the colors swirl about.

And the soap and fat want to join together in pockets called “micelles” (similar to how soap lifts the grease off your dirty pans!), so that also causes movement.

Eventually, everything reaches a balance or “equilibrium”, and the reaction ends. But the milk colors will still move about for a bit as the excess energy works its way out.

Magic Milk Variations

You can change the experiment by changing up the colors and adding cookie cutters to add different themes – it’s a fun way to change things up with this classic science experiment.

Magic milk experiment in a bowl

Recommended Science Experiment Books for Kids

Want more great science experiments with your kids? Check out some of our favorite science experiment books! And you can grab the instructions and materials list for this cool magic milk experiment below.

I enjoy simple science experiments that use household items that are easy to find. If you have any of these science books, you can plan ahead and gather the materials you need so you always have supplies ready to go for science.

Awesome Physics Experiments for Kids: 40 Fun Science Projects and Why They Work (Awesome STEAM Activities for Kids)

Simple Magic Milk Science Experiment

  • 1 1/2 cups of milk
  • Liquid food coloring
  • Cotton swabs
  • Dinner plate or shallow dish
  • Small container

Instructions

  • Pour about one tablespoon of dish soap into a small container.
  • Pour milk onto a plate. (It’s ok if you see bubbles.)
  • Drip a few drops of food coloring of choice in the center of the milk. You can get creative with where you drop the drops and space them out how you wish. (Note: Food coloring may spread out slightly as pictured.)
  • Dip a cotton swab into the dish soap.
  • Place the cotton swab in the middle of the colors and watch what happens! You should see the colors start to spread out towards the sides of the plate and change over time. You can repeat this step a few times.
  • Tip: Kids can take their cotton swab and “draw” or “swirl” in the colors. Eventually the colors will mix together until the milk becomes one color.    
  • If you allow the milk to sit a while before all colors are mixed completely together, you can see the milk change in neat ways as pictured here.
  • Watch over time how different things look!
  • When complete, dispose of milk in the sink. 

Recommended Products

As an Amazon Associate and member of other affiliate programs, I earn from qualifying purchases.

Dawn Dish Soap

Did you love this simple science experiment? Try one of these other fun science activities to add some fun science experiments to your homeschool.

More Science Experiments

Hovercraft Science Experiment

Fizzy Rainbow Science Activity

Grow a crystal rainbow

Cool Pop Rocks Experiment

Sugar Rainbow Density Tower by STEAMsational

I share educational printables and activities to help homeschoolers make learning science fun and engaging!

Leave a Reply Cancel reply

Your email address will not be published. Required fields are marked *

  • Grades 6-12
  • School Leaders

At ISTE? Join us at booth 1359!

Magic Milk Experiment: How-To Plus Free Worksheet

This classic experiment teaches kids about basic chemistry and physics.

Magic Milk Experiment How to Plus Free Worksheet

This fun experiment is a classic for a reason! In the magic milk experiment, kids learn about simple chemical reactions and physical properties using only a few ingredients. Read on to see how to do the experiment, and fill out the form on this page to grab your free recording sheet.

How does the magic milk experiment work?

In this experiment, you pour some milk into a shallow dish. You then add drops of food coloring to the surface of the milk. Using a cotton swab dipped into dish soap, you lightly brush the surface of the milk. The dish soap breaks the surface tension of the milk, and the soap molecules try to attach to the fat molecules in the milk. This causes swirls and bursts of fun rainbow colors.

What does the magic milk experiment teach?

This experiment teaches us about the science of molecules and how substances interact. The soap breaks down the fat molecules and makes them move apart, showing us a simple but fascinating example of chemistry in action!

Is there a magic milk video?

This video shows two different ways to do the magic milk science experiment, using very similar ingredients.

Materials Needed

Milk, dish soap, food coloring, and cotton swabs for magic milk experiment

To do the magic milk experiment, you will need:

  • Shallow bowl or plate
  • Milk, blue dish soap
  • Cotton swabs
  • Food coloring (inexpensive works better than gel coloring)

Our free recording sheet is also helpful— fill out the form on this page to get it.

Magic milk experiment steps:

1. pour milk into a shallow dish or bowl, just enough to cover the bottom..

Milk in bottom of pie dish

2. Add drops of food coloring all over the surface of the milk.

Food coloring drops on surface of milk for science experiment

3. Dip the end of a cotton swab into a separate dish of blue soap.

Q tip dipped into dish soap

4. Lightly brush the top of the milk with the cotton swab, and watch what happens!

Final stage of magic milk experiment

Grab our free magic milk experiment worksheet!

cool magic milk experiment

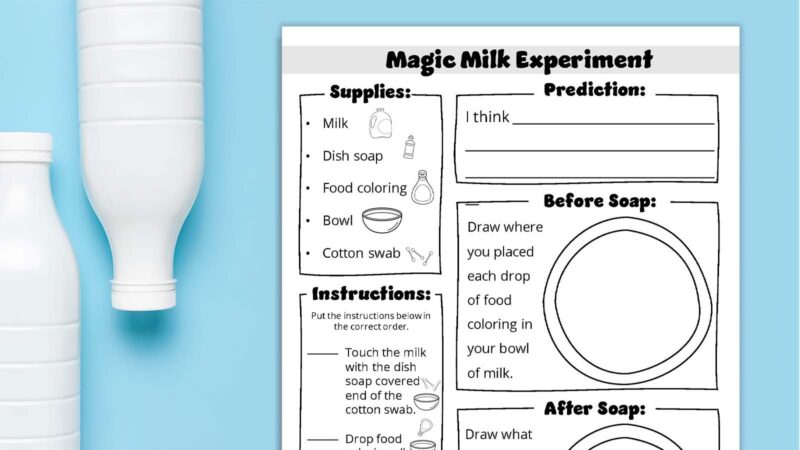
Fill out the form on this page to get your worksheet. The worksheet asks kids to guess the correct order of the steps in the experiment. Next, kids must make a prediction about what they think will happen. They can use the provided spaces to draw what happens before and after they add the dish soap. Did their predictions come true?

Additional Reflection Questions

  • What happened when we added the soap to the milk?
  • Why do you think the colors appeared on the milk’s surface?
  • What do you think would happen if we added more soap to the milk?
  • What do you think would happen if we used a different liquid instead of milk?

Can the magic milk experiment be done for a science fair?

Yes! If you want to do the magic milk experiment for a science fair, we recommend switching up some of the variables. For example: Does the fat content of the milk matter? Does the type of dish soap matter? Form a hypothesis about how changing the variables will impact the experiment. Good luck!

Looking for more experiment ideas? Check out our big list of experiment ideas here.

Plus, be sure to subscribe to our newsletters for more articles like this., you might also like.

Easy science experiments including a "naked" egg and "leakproof" bag

72 Easy Science Experiments Using Materials You Already Have On Hand

Because science doesn't have to be complicated. Continue Reading

Copyright © 2024. All rights reserved. 5335 Gate Parkway, Jacksonville, FL 32256

Download Now : Our FREE 30 Minute Weeknight Dinner

Made In A Pinch

Magic Milk STEM Experiment: Colorful Science for Kids

Are you ready to have some STEM fun with your kiddos? There’s more to this Magic Milk experiment than meets the eye. Learn all about color mixing, chemical reactions, surface tension, and more!

magic milk STEM activity pin

STEM activities provide a fantastic opportunity for kids to explore the world around them and develop a love for science. The “Magic Milk” experiment combines the principles of chemistry and color theory to create a visually appealing and fun learning experience.

Magic Milk is a simple, inexpensive, and safe STEM activity that kids of all ages can enjoy!

Whole milk, food coloring, and a bit of dish soap come together to show children a magical explosion of colors.

This activity not only piques their curiosity but also serves as an excellent teaching moment to delve into the science behind the colorful phenomena. Learning the concepts of surface tension, chemical reactions, and color mixing can begin to cultivate a lifelong love for STEM subjects.

This is one of those simple science experiments that can teach kids things they never thought of before! I first learned about this food coloring experiment (and many other simple experiments) from the  Steve Spangler Science website .

If you love doing STEM activities with your kids, make sure you check out my Earth Day Science Experiment and Snow Volcano Experiment activities too!

Let’s dive in and have some science fun!

magic milk

The Science Behind Magic Milk

You might be wondering what causes the amazing color explosion in the magic milk STEM activity. There are several factors to consider in this fun science experiment:

To understand what’s happening in the Magic Milk STEM activity, it’s important to know that milk is made up of water, vitamins, minerals, fats, and protein molecules. In this experiment, you observe the interaction between fat (in the milk) and soap.

The type of milk you use for this activity matters . Whole milk has a higher fat content (roughly 3.25%) than reduced-fat varieties (like 2% or 1%).

The fat content of the milk is important for the chemical reaction involved in the activity.

Love crafts and easy DIY projects? Grab this mini activity book for more by clicking the image below – free! 👇

Click here to get your free mini-book of DIY activities for kids of all ages.

Food Coloring

Now, let’s move on to the color explosion. The magic milk experiment relies on the interaction between milk’s fat molecules and dish soap.

When you add dish soap to the plate of milk, its molecules mingle with the fat molecules, causing swirling patterns of color. This is because dish soap molecules have a dual personality, with a water-loving head (hydrophilic end) and a water-fearing (hydrophobic) head or end.

As the soap molecules find their way into the milk, the hydrophobic end of a soap molecule grabs fat molecules. This forms little clusters called micelles, where the soap molecules surround and isolate the fat molecules. 

The colorful twist comes from the food coloring you’ve added to the milk. As the micelles move around, they push the food coloring molecules into different paths, leading to a rainbow of colors and mesmerizing patterns.

Surface Tension

The surface tension of the milk also plays a role in this activity. Surface tension is a property of liquids where molecules at the surface form a sort of dome due to their molecular bonds.

The dish soap disrupts the equilibrium of the milk’s surface tension, allowing the micelles to move freely and create those beautiful swirling patterns.

Magic milk is a great visual representation of scientific concepts, making it an excellent choice for a milk science fair project. Have fun experimenting with different types of milk to see how the fat content affects the results, and enjoy the dazzling display of colors!

magic milk

Magic Milk Science Experiment Materials Needed

All you need to do this are a few common everyday ingredients you likely already have in your kitchen! 

Let’s make sure you have everything ready to dive into some colorful, milky science by gathering up these supplies:

  • Whole milk – other percentages can be used as a variable
  • Liquid food coloring – in a variety of colors like primary colors or pastel colors (I used orange, green, yellow, red)
  • Dish soap (e.g., Dawn dish soap)
  • Q-tips – cotton swab or cotton ball

experiment supplies

Magic Milk Step-by-Step Directions

Introducing the Magic Milk STEM activity, an engaging and fun experiment for kids and preschoolers. This eye-catching activity provides a great opportunity for little scientists to observe fascinating color changes and reactions. Follow this friendly, step-by-step procedure to create some science fun at home.

Pour milk onto the large, shallow glass plate. Pour just a thin layer of milk to cover the bottom of the plate.

pouring milk onto plate

Drop 4-5 drops of food coloring (in the colors of your choice) around the plate. Leave a little space between each drop. 

Pro Tip: You can use as many colors as you like, and placing them near each other will create more exciting visual effects.

adding food coloring to milk

Each time you use a color, add a drop of dish soap to your cotton swab.

swirling food coloring around milk

Place the Q-tip in the middle of the food coloring in the milk.

Watch what happens to the food coloring!

Swirl the Q-tip around and ‘paint’ the milk. Watch the cool patterns in the milk as you do this.

magic milk

Observe The Magic Milk In Action

Touch the dishwashing liquid-covered Q-tip gently to the milk’s surface, preferably near the food coloring drops.

You’ll quickly notice the food coloring appears to burst and dance across the surface of the milk. This happens because the dish soap breaks down the fat molecules in the milk, causing the molecules to move quickly and spread out the food coloring within the milk.

The result is a mesmerizing display of swirling colors that is sure to inspire young minds!

Magic Milk Experiment Variations and Extensions

This experiment is easy and uses inexpensive materials. More importantly, it’s fun for kids!

If you’re looking to expand on the magic milk STEM activity, here are a few options to consider:

  • Experiment with different types of milk:  Try using different types of milk, like skim milk, 1%, 2%, and whole milk to observe how the variations impact the experiment. Compare the results and see if your child can determine if the fat content in the milk has an effect on how the colors move. You can also try using different kinds of milk , such as almond, soy, or oat milk, to see how that variable impacts your results.
  • Play with the colors:   Encourage your child to mix different food colors and see what new colors they can create in their rainbow milk experiment. This will give the experiment a creative touch and help your child learn color combinations when mixing different colors.
  • Gel food coloring:  To take the experiment to another level, try using gel food coloring instead of liquid. Gel food coloring is more concentrated, so it might produce different results. This variation can help your child learn about the different forms and properties of colorants.
  • Create patterns:   Teach your child to create various patterns (such as concentric circles), different shapes, a color grid, or even draw a simple picture using the food coloring drops. This offers to make an art project out of the science experiment.
  • Play with the thickness of the milk:  Instead of a thin layer of milk on a dish, what happens if you use a glass of milk?

Here are some additional ideas for color-changing milk experiment variations and extensions that can be tried at home:

  • Use a dropper to add the dish soap, and try placing it at different spots on the milk to see how the colors react.
  • Experiment with different dish soap brands or even liquid hand soap, comparing how they affect the color explosion in the milk.
  • Place a piece of paper on top of the milk after the colors have exploded and gently press on it. Carefully lift the paper and let it dry, creating a beautiful, one-of-a-kind piece of art!

Enjoy exploring these easy science experiment variations with your child, allowing them to develop their creativity while learning about the properties of liquids and colors.

magic milk

Important Magic Milk Safety Notes

First and foremost, always have  adult supervision  when conducting this experiment with young children. While the materials involved are generally safe, adult guidance will help avoid any mishaps and ensure proper handling of the supplies.

Keep the food coloring and dish soap out of reach of children.

Here are some essential safety tips to remember while performing the magic milk activity:

  • Use only non-toxic food coloring and dish soap that are safe for children.
  • Be mindful of possible allergies to milk or any other ingredients used in the activity. If a child has a milk allergy, consider using a non-dairy alternative.
  • Gently pour the milk into the shallow dish to prevent any spills, and securely close the food coloring and dish soap containers when not in use.

I HIGHLY recommend having paper towels or cleaning cloths handy to clean up any spills immediately to avoid stains.

Magic Milk Questions to Consider

As you conduct the magic milk STEM activity and take note of your magic milk experiment results, it’s helpful to keep a few questions in mind to promote critical thinking, observation, and understanding of the underlying concepts.

What did you notice before and after? 

Did you notice a plain layer of milk and food coloring drops sitting on top before you started the experiment? After adding the dish soap and witnessing the reaction, focus on the patterns and changes in the colors.

Comparing these observations before and after will help you understand how the dish soap interacts with the milk.

What happened when you put the Q-tip in the milk? 

When you dipped the Q-tip in dish soap and touched it to the milk surface, the colors likely moved rapidly and created an explosion of vibrant patterns.

Take note of how the colors interacted with each other, and how the movement changed over time.

Why do you think that happened? 

This reaction occurs because the dish soap disrupts the bonds between fats and water molecules in the milk, causing the food coloring to move along with the separation.

Consider how the chemicals in the dish soap and the properties of the milk contributed to this effect.

Why do you think the colors stopped moving? 

Eventually, the colors will slow down and stop moving. This is because the dish soap has reached a saturation point, where it cannot disrupt any more molecules in the milk.

It’s interesting to explore how saturation affects the reaction and its limits.

What else did you observe? 

Apart from the main reaction, there may have been other subtle details to observe. For example, maybe you noticed that different food coloring colors spread at different rates or created distinct patterns. Reflecting on your overall observations can lead to deeper comprehension and appreciation for the magic milk experiment.

swirling food coloring around milk

Frequently Asked Questions

Whole milk is the preferred choice for the magic milk experiment due to its higher fat content. The fat in the milk interacts with the dish soap, allowing the food coloring to spread and create the “magic” effect. You could also use 2% milk, but the results might not be as vibrant.

The magic milk experiment is a short-lived activity. Once you’ve mixed in the dish soap, the reaction occurs for a few minutes before the food coloring settles and the milk returns to its original state. It’s best to enjoy the experiment while it’s happening and not try to preserve or store the outcome.

If you’re having trouble with your magic milk experiment, there could be a few reasons. First, make sure you’re using whole milk, as the high fat content is essential for the best results. Second, ensure you’re using liquid food coloring, as gel or powdered forms may not produce the desired effect. Finally, check that you’re adding the dish soap correctly: add just a drop of soap in the center of the milk and the food coloring to see the reaction take place.

The magic milk experiment relies on the fat content in dairy milk for the reaction to occur. Almond milk, being a non-dairy milk substitute, generally has a lower fat content than whole milk. Although you can still try the experiment with almond milk, the results may vary and might not be as vibrant or impressive.

More Hands-On Fun

Isn’t this science activity lots of fun?! If you want even more great ideas and inspiration, check out these posts:

  • Dancing Raisins Experiment
  • Fireworks In A Jar Science Experiment
  • Easy Rainbow Walking Water Experiment
  • DIY Rainbow Spaghetti For Sensory Fun
  • How To Melt Crayons Into New Shapes

A plate with swirling patterns of pastel orange, green, and yellow colors, created using milk, with four cotton swabs arranged around the rim of the bowl.

Magic Milk STEM Experiment

Ingredients.

  • Large dinner plate
  • 1-2 cups of whole milk
  • Food coloring (orange, green, yellow, red)
  • Small container dish soap

Instructions

Pour milk onto the large glass plate. Pour enough milk to cover the bottom of the plate.

Drop 4-5 drops of each color of food coloring around the plate. Leave a little space between each drop. Dip a Q-tip into the dish soap each time you use a color.

Place the Q-tip in the middle of the food coloring in the milk. Watch what happens to the food coloring!

Similar Posts

Free Thanksgiving Bingo (Acts of Kindness Bingo) Printable

Free Thanksgiving Bingo (Acts of Kindness Bingo) Printable

160+ Elf On The Shelf Names: Boy Elf Names

160+ Elf On The Shelf Names: Boy Elf Names

BEST Preschool Backpacks For Kids To Take To School

BEST Preschool Backpacks For Kids To Take To School

10 Amazing STEM gift ideas kids will love!

10 Amazing STEM gift ideas kids will love!

100th Day Of School Coloring Page Printable Pack

100th Day Of School Coloring Page Printable Pack

Salt Dough Dinosaur Fossils

Salt Dough Dinosaur Fossils

Leave a reply cancel reply.

Your email address will not be published. Required fields are marked *

This site uses Akismet to reduce spam. Learn how your comment data is processed .

Laughing Kids Learn

Where learning is made fun

Magic Milk Science Experiment

August 3, 2014 by Kate 81 Comments

Magic Milk science experiment for kids

This particular science activity is lots of fun and a great introduction to those children who haven’t had much experience in observing chemical reactions etc. I had shared this magic milk science experiment  a long time ago and it proved particularly popular on my  Laughing Kids Learn Facebook page .

Recommended age: 2 years + (Active supervision is always advised with my activities)

What you will need for milk experiment

You will need – 

  • 1/2 cup – 1 cup milk
  • 1 drop of dishwashing liquid
  • food colouring
  • toothpicks (optional)

This science experiment is simple to set up and quickly gets to the ‘wow factor’ that will bring a smile to your child’s face.

Lots of colours in this science experiment about colour

Simply begin by pouring milk onto a plate. You will need to ensure you have enough milk to cover the base of the plate.

Observing milk experiment changing colour

Let the magic happen!!

Carefully add one drop of dishwashing liquid to the middle of the milk.

Quickly a chemical reaction will occur, which will see the colours begin to spread away from the dishwashing liquid drop and begin mixing and churning the colours.

Color magic milk science experiment for kids

It’s absolutely amazing and you can observe  it continually move and swirl for a decent amount of time!

Colour changing magic milk science experiment for kids. Using toothpick to swirl it around.

What is the science behind it, simply put?

Milk is made up of mostly water but it does contain vitamins, minerals, proteins and small droplets of fat. The fat and proteins are super sensitive to changes in the milk and so when the dishwashing liquid is added a chemical reaction occurs.

The soap and fat work hard to join together, which causes the movement. When food colouring is added we are able to witness this chemical reaction occurring. See here for more information .

Going further

You might like to experiment further by adding an extra drop of soap to see if there is more movement. If you see more movement you’ve discovered that there was still more fat that hadn’t combined with the soap. You might like to continue the process.

mixing and changing colours in this magic milk science experiment for kids

Would your child love observing this science experiment?

Some other ideas you’ll love – 

how to make flavoured sherbet. Simple recipe and edible science activity for kids.

August 9, 2014 at 2:07 am

This is so fun and easy. I really admire all of the cool experiments that you do with your little one.

' src=

March 27, 2017 at 3:32 am

You are right even though I don’t have kids.

August 9, 2014 at 2:08 am

Wow, this is so fun and easy. I really admire all of the cool experiments that you do with your little one.

' src=

August 9, 2014 at 3:59 pm

Awww thanks Nicole! We do have lots of fun. Thanks for popping by and taking the time to comment. 🙂

' src=

December 29, 2020 at 8:25 pm

What is the Aim behind this experiment?

' src=

August 11, 2014 at 11:25 pm

Love all the recipes please keep me posted.

August 12, 2014 at 8:49 pm

Have you subscribed to my blog Gwenda? I’d love to have you on board and that way you won’t miss a post. Click over to my blog http://www.laughingkidslearn.com and add your email address. Warm regards, Kate

' src=

August 18, 2014 at 4:33 pm

Great idea It doesn’t work with ecostore dishwashing liquid but my 3 year old had a great time swirling the colours Great blog!

August 18, 2014 at 4:58 pm

Thanks Heather for sharing that information. Very helpful! I’m really glad your little 3 year old still enjoyed the activity. We had lots of fun with it and little Possum found mixing the colours quite irresistible too. Hope you’ve had a chance to subscribe to my blog. Thank you kindly for your comments. 🙂

' src=

September 27, 2014 at 8:15 am

I love this and all of your posts. I have a little man (1 this December) and I have so many things to do with him, thanks to you! Cheers from Seattle!

September 27, 2014 at 9:06 pm

What a beautiful message to send me Meg. Thank you so very kindly. I’m thrilled to hear that you’re enjoying the posts I’m sharing and it is keeping your little one year old busy. I can imagine the visual of this science experiment would impress. 🙂

' src=

January 24, 2015 at 12:40 pm

I love your experiments. I teach a science club at the Boys & Girls Club And I frequently use your ideas.

January 26, 2015 at 5:02 pm

Thank you Dixie! I really appreciate hearing that. Feel free to send me through a photo and I can share it on our FB page. 🙂

' src=

February 24, 2015 at 2:29 am

This experiment is even better if you use half and half. More fat equals more reaction 🙂

February 24, 2015 at 8:11 am

So half milk and half detergent?

' src=

April 11, 2015 at 4:29 am

Half & Half is a high-fat milk product — half milk half cream.

April 11, 2015 at 11:49 pm

The more fat in the milk the greater the reaction will be thanks E. 🙂

' src=

December 7, 2015 at 10:56 pm

I would like to show this at a school in a slum area in Africa. However, I’m reluctant to “waste” any foodstuffs, in particular if the kids would long for eating/drinking it. Does anybody have an idea how the milk could possibly be replaced by other ingredients? Obviously fat would be required. I assume that the color of the milk also plays a role, so it is probably not easy.

December 7, 2015 at 11:16 pm

Thank you for your comment. I am no aware of any alternatives and can appreciate your thoughts on this. Is it possible for them to see a video of it being done. I know it isn’t the same as them actually doing it, but I’m sure they will still get the wow factor. Hope that helps.

' src=

January 19, 2016 at 12:35 pm

Thanks for this great idea! I am a homeschool mom and we are doing science experiment week. We are sooo doing this one this week! It’s very affordable and you already have the items on hand. Perfect!

January 19, 2016 at 11:33 pm

Hi Helen! So wonderful to receive your message. I’m thrilled you are going to give this experiment a go. We absolutely love it. 🙂

' src=

February 19, 2016 at 2:06 am

February 21, 2016 at 1:16 pm

You are very welcome Luke!

' src=

April 15, 2017 at 10:06 am

You could probably use oil and water as a substitute for milk.

Also, if you are going to use this to teach kids, it’s probably important to note that this isn’t a chemical reaction. Chemical reactions involve an irreversible change to the molecules themselves and are either exo or endothermic. This is neither. It’s actually physics…the milk’s surface tension is disturbed by the presence of dishwashing liquid (it probably wouldn’t work with dishwasher detergent, so if people are having issues, double check which kind of detergent you are using). Still a very cool demonstration of science. I can’t wait to try it with my niece.

April 16, 2017 at 5:52 pm

Thank you for your great comments. I will keep them in mind the next time I do a similar type activity.

' src=

September 9, 2016 at 3:42 pm

You named your child Possum?

September 11, 2016 at 8:35 am

' src=

February 11, 2019 at 5:22 am

' src=

September 27, 2016 at 11:30 pm

you make Grandparenting babysitting a “joy” …thank you for all the easy and quick ideas!

September 28, 2016 at 5:39 pm

Oh Joy, you make me smile from ear to ear. Thank you so much. Love to hear which activity you have enjoyed the most. 🙂

' src=

November 8, 2016 at 10:54 am

I’ve tried this with whole milk and 3 different types of dish soap and I can’t get it to work! What am I doing wrong?!

November 9, 2016 at 2:12 pm

How unusual! The fat in the whole fat cows milk reacts to the dish soap. I can only image that you might be using soap free variety of dish soap or a variation of milk (soy, almond etc won’t work). Let me know how you go Dena.

' src=

January 23, 2017 at 4:49 am

Thank you! My 8-year-old loved it and my 15-month old liked watching it. Thanks for sharing!!!

January 23, 2017 at 9:59 pm

You’re so very welcome Maria. Thrilled you were able to entertain both ages. 🙂

' src=

February 14, 2017 at 2:53 am

I tried this with my 3 and a half year old today & it didn’t work. We ended up with a murky mess. It seemed there was a reaction as soon as I added the food colouring (I hadn’t added the soap at this point). It was fun to do anyway as we tried to figure out why it didn’t look like your photos and we got a “wow” regardless! Thank you

February 14, 2017 at 6:05 pm

Hi Tracy. I’m so confused why it wouldn’t work for you! It’s the detergent attaching itself to the fat molecules in the milk that causes the reaction so you should see a reaction when you have the milk and food colouring together then add the detergent. Sometimes if you don’t have a full fat milk it can reduce the reaction. I’m glad you still had fun.

' src=

March 6, 2017 at 8:33 am

Is your child learning about colour? You’ll be amazed at the beautiful creation you make together in this easy and inexpensive activity! Who says art and science don’t mix?

' src=

March 25, 2017 at 4:24 am

The is goneing to be good i like a lot me will do it at home i like do cool thing

March 30, 2017 at 2:14 pm

Have fun with it. 🙂

' src=

November 12, 2018 at 1:58 pm

SOOOOOOOO GOOOOOOOOOOOOOOOOOOOD

November 19, 2018 at 11:00 pm

Thank you! 🙂

' src=

July 1, 2019 at 2:52 pm

I am from New Zealand.

' src=

June 4, 2020 at 12:59 am

Thank you so much! we had a blast!

June 9, 2020 at 2:11 pm

Yay! That’s wonderful news.

' src=

October 4, 2020 at 5:10 pm

Hello lovely blog and photos BUT please adjust your explanation. This is NOT strictly a “chemical reaction” as the molecules do not break and form new bonds to form new chemical entities, instead they simply move around due to intermolecular forces between the different molecules – fat, protein and water – where positive, negative, hydrophilic or hydrophobic ends of the different molecules attract or detract one another …here is an excellent explanation 🙂

https://www.acs.org/content/acs/en/education/whatischemistry/adventures-in-chemistry/experiments/colors-move.html

October 5, 2020 at 1:13 pm

Gah, that’s a difficult explanation for a toddler. Can you somehow simplify for our younger audience? Thank you for helping me teach out community.

' src=

January 30, 2021 at 9:07 am

There is no chemical reaction going on here. Cute way of explaining hydrophobic, hydrophilic interactions but it is not chemical.

[…] Magic Milk Science Experiment (Laughing Kids […]

[…] Magic Milk […]

[…] oder von laughing kids learn […]

[…] Magic Milk Science Experiment [Laughing Kids Learn] […]

[…] Magic Milk Science Experiment from Laughing Kids Learn […]

[…] laughingkidslearn […]

[…] the time, so they were thrilled when I told them we would be doing a milk experiment this week from laughing kids learn!  I poured some milk in a bowl and each girl got to drip some food coloring […]

[…] tension and the ink dances.  Or so it would appear from videos and pictures, such as here or here.  However, I believe these are all based on either American food colourings (where the legislation […]

[…] 2. Magic Milk Experiment […]

[…] Magic Milk Science Experiment – from Laughing Kids Learn […]

[…] My toddler especially loved the magic milk science experiment. He had so much fun watching the colors swirl around, and then at the end, he slowly mixed the colors until it was a muddy brown. All you need for this one is milk, food coloring, and dish soap. The simple directions are on Laughing Kids Learn. […]

[…] I came across a craft this morning (here) and it was so easy and looked so interesting I had to give it a shot. And I think you’ll enjoy […]

[…] Magic Milk Science Experiment […]

[…] Magic Milk Science Experiment from laughingkidslearn.com […]

[…] 1) Magic Milk Science Experiment […]

[…] Learn more: Laughing Kids Learn […]

[…] Magic Milk Science Experiment: Perfect for little ones who have not yet experienced chemical reactions. (Laughing Kids Learn) […]

[…] https://laughingkidslearn.com/magic-milk-science-experiment/ […]

[…] Learn more about this activity at laughingkidslearn.com […]

[…] This explicit science exercise is numerous enjoyable and a fantastic introduction to these youngsters who haven’t had a lot expertise in observing chemical reactions. From Laughing Kids Learn. […]

[…] This specific science exercise is plenty of enjoyable and an excellent introduction to these kids who haven’t had a lot expertise in observing chemical reactions. From Laughing Children Be taught. […]

[…] This particular science activity is lots of fun and a great introduction to those children who haven’t had much experience in observing chemical reactions. From Laughing Kids Learn. […]

Please Leave a Comment: Cancel reply

Your email address will not be published. Required fields are marked *

Find Activities by Age

  • 0 – 12 months
  • 1 – 3 years
  • 3 – 5 years
  • 5 – 10 years

Find Activities by Celebration

  • SHOP PRODUCTS

Privacy Policy

  • Disclosure and Privacy Policy

Find posts by month

Taming Little Monsters

Magic Milk Science Experiment for Kids

Categories Science , STEM

This Magic Milk Experiment is a fantastic science investigation that is always lots of fun. With just a few simple ingredients you can learn all about soap and how it affects different kinds of milk.

You can do this experiment with young children, like preschoolers, to get them excited about learning. Or older kids can make their own magic milk science fair project.

cool magic milk experiment

Disclosure: Adult supervision is required for all activities at all times.

Table of Contents

  • More STEM activities to try
  • Materials needed
  • Watch the video

Instructions

  • What is the science you’re learning
  • Why is this important
  • Turning it into an experiment
  • Free printable recording sheet

More STEM Activities to try

Kids of all ages love a classic science activity. If you want another fun way to teach your kids STEM, then check out these other fun activities.

  • Make a Book – STEM Invitation to Play
  • How to Make A Pom Pom Shooter
  • Floating City – STEM activity for Kids
  • What Melts In The Sun Science Experiment
  • Pine Cone Science Experiment

For more ideas, take a look at these 42 STEM Activities for Kids .

Materials Needed

  • 1 Cup of whole milk
  • Food coloring
  • Cotton bud (optional)

Watch the Video

cool magic milk experiment

​How to do the Magic Milk Experiment

1. pour a glass of milk onto a plate..

cool magic milk experiment

You’ll need a wide, shallow dish for this simple science experiment. A plate, which allows for a thin layer of milk is perfect for watching the color explosion that is about to happen.

2. Add drops of food coloring.

cool magic milk experiment

I added a variety of colors to my milk. Just placing drops all throughout the surface of the milk. 

You can add your drops wherever you like. If you are doing this with a curious preschooler who will want to try it more than once, you can even experiment to see what happens when you only place dots near the center of the plate versus what happens when you only place them around the edge.

I definitely added too much food coloring to my milk, feel free to just add a few drops because the experiment will still work.

​3. Place a drop of dish soap in the middle

cool magic milk experiment

Place a little dish soap (you’ll only need a drop) in the middle of the plate. 

I just poured mine straight out of the bottle. However, it may be easier for young kids to scoop up a few drops of soap using a cotton swab and then placing the swab in the middle of the milk.

4. Watch the reaction.

cool magic milk experiment

The colors in the milk will instantly move to the outer edges of the plate. But if you keep watching then you’ll see the constant movement of colour as the colors swirl around all by themselves. This is best to see in the video , which shows a sped up version of 10 minutes of the reaction happening.

The Science Behind the Magic

cool magic milk experiment

What is actually happening to make this milk magic?

Milk consists of a variety of different molecules including proteins, nutrients, fats and water. In this experiment we are going to be focusing on the fat molecules (which are non-polar) and water molecules (which are polar). 

These two molecules do not mix. When they are in milk, they are floating around separately.

cool magic milk experiment

Soap is both polar and nonpolar, which means it will be attracted to and bond with both fat and water. The hydrophobic part will bond with fat and the hydrophilic part will bond with the water. This means that soap acts like a bridge or a magnet between these two different types of molecules.

cool magic milk experiment

Since soap is like a magnet for both fat and water, this means that when you add soap into milk these different types of molecules are going to be attracted to the soap. This movement of molecules is what you see in the experiment. Initially the movement you observe is of the separate fat and water molecules being attracted to the soap molecules, and then the whole soap/fat/water molecule as a whole goes flying around the plate.

cool magic milk experiment

Without food coloring, we wouldn’t be able to see this movement. By adding in some color, we can see how the molecules in the milk move around, causing tiny little currents for the food coloring to follow.

When all of the fat has been bonded by the soap then the reaction will stop and your experiment is complete. This is why milk with higher fat content will react for longer than skim milk, because it has more fat available to be reacted with.

Why is this important?

cool magic milk experiment

Knowing how soap works explains why it’s important to wash our hands to prevent the spread of diseases.

Bacteria are organisms, some of which (not all) can cause diseases.

The cell membrane of the bacteria (which is kind of like the skin of the cell) is made up of fats (otherwise known as a phospholipid bilayer). When we rub soap over our hands it bonds to the fat in the bacterias cell membrane (just like it bonded to the fat in the milk experiment).

Then when we place our hands under running water, the other part of the soap bonds with the flowing water. Since the water is flowing, it takes the bacteria it has already bonded to with it down the drain.

cool magic milk experiment

Turning it into an Experiment

cool magic milk experiment

The easiest way to turn this chemical reaction into an actual experiment is to try milks with different ratios of fat. You can try the same experiment with different types of milk (or water) and then time how long it takes for the reaction to slow down or stop.

Different types of liquids to try include:

  • Water (0% fat)
  • Skim or low fat milk (0.5 – 1% fat)
  • Whole / high fat milk (3.25% fat)
  • Whipping cream (30% fat)

cool magic milk experiment

This is a wonderful way to teach children about the scientific method. You can explain the basic principles of this easy science experiment and then get them to write down a hypothesis before timing how long the food colouring spreads.

You can also download and print the following recording sheet to use at home or in your classroom. Just click the large blue button below to get your copy.

Are you going to try the Magic Milk Experiment with your kids? Don’t forget to pin the idea for later.

cool magic milk experiment

Magic milk is a fun science activity for kids.

Use it to show children how soap works and why washing your hands is important.

Or just use it as a fun activity to get kids excited about learning. No matter which way you go, your kids will love it.

  • Pour a glass of milk into a small plate
  • Add drops of food coloring to the milk
  • Place a drop of dish soap in the middle of the plate (you can also use a q-tip dipped in soap to do this step).
  • Watch the reaction. The colors will now spread and mix all by themselves.

The higher the fat content the milk has, the longer the reaction will take to stop.

If you want to turn this into a proper experiment, where kids have to make thier own hypothesis and record their results, try milks with different fat contents as see what happens.

More Play Based Learning for Kids

cool magic milk experiment

STEM Experiments for Toddlers

Here are 25 water STEM activities for kids to try these summer holidays. Learn some science and cool off with these fun experiments.

Water STEM Activities for kids

Learn how to make a walking water science experiment - a fun rainbow themed STEM activity for kids. Perfect for preschool or kindergarten.

Walking Water STEM Activity for Kids

Learn how to set up an indoor water cycle demonstration. This is a simple science activity for kids that will teach them about evaporation, condensation and precipitation.

Water Cycle Science Experiment

Share this:

  • Click to share on Facebook (Opens in new window)
  • Click to share on Pinterest (Opens in new window)
  • Click to share on Twitter (Opens in new window)
  • Skip to main content
  • Skip to primary sidebar
  • Amazon Favorites
  • Search this website

A Dab of Glue Will Do

Little Learners, Big Ideas

PS PK K 1 2

Magic Milk Science Experiment

I'd love it if you shared!

  • Pinterest 807

This magic milk science experiment is a classic for kids of all ages. Using common, nontoxic kitchen supplies, the kids will create vibrant art while learning about the science behind the swirling colors that truly makes this experiment magical.

A bowl of milk with different colors of food coloring swirling in it

Get Ready for the Magic Milk Science Experiment:

This science experiment only requires a few common kitchen supplies:

  • Milk (we used whole milk)
  • Casserole dish, baking pan, or plate
  • Food coloring
  • Liquid dish soap (make sure it is NOT antibacterial)
  • Magic Milk Printable

Print out a couple of copies of the free printable worksheet available below so the kids could keep track of their results.

This magic milk science experiment is a classic for kids of all ages. Using common, nontoxic kitchen supplies, the kids will create vibrant art while learning about the science behind the swirling colors that truly makes this experiment magical.

Once we gathered our supplies, we sat at the kitchen table to do our science experiment. Pour a thin layer of milk into the dish and then the kids chose a few colors they wanted to use.

This magic milk science experiment is a classic for kids of all ages. Using common, nontoxic kitchen supplies, the kids will create vibrant art while learning about the science behind the swirling colors that truly makes this experiment magical.

The kids then squeezed a couple of drops of food coloring into the milk in their dish .

Then, carefully, they dripped one drop of dish soap right into the middle of the colored milk .

Oh my, were there squeals of delight and surprise as they watched the colors scatter like fireworks!

This magic milk science experiment is a classic for kids of all ages. Using common, nontoxic kitchen supplies, the kids will create vibrant art while learning about the science behind the swirling colors that truly makes this experiment magical.

The milk continued to move and mix and scatter the colors as if by magic. It continued for several seconds before coming to rest.

This magic milk science experiment is a classic for kids of all ages. Using common, nontoxic kitchen supplies, the kids will create vibrant art while learning about the science behind the swirling colors that truly makes this experiment magical.

The kids tried to drip more dish soap into the milk, but guess what? Nothing happened the second time around. Why not?

The Science Behind Magic Milk

There are a couple of things going on that explain what is happening behind the magic of magic milk.

First, all liquids have this effect called surface tension . It basically means that the molecules on the surface of the liquid bead together in a little dome because of their molecular bonds. If you have ever filled a cup of water past the rim of the glass you may have noticed how the water forms a dome on top and somehow stays suspended a little above the rim. This is because of surface tension.

In this magic milk experiment the milk and food coloring form a little dome .

However, when dish soap is poured over the surface, the surface tension is broken because the dish soap breaks those bonds . This causes the colored milk to spread out like a flood over the surface of the milk.

This magic milk science experiment is a classic for kids of all ages. Using common, nontoxic kitchen supplies, the kids will create vibrant art while learning about the science behind the swirling colors that truly makes this experiment magical.

The second effect at work here has to do with the interaction between the fat molecules in the milk and the soap molecules .

Soap is made up of two sides:

  • one side loves water (it is hydrophilic)
  • the other side loves fat and oil (it is hydrophobic).

Soap works by grabbing oils by its hydrophobic side and bonding with water by its hydrophilic side. When the soap is washed away with water, it takes the oils and fats along with it.

When dish soap is dropped into milk, there is a swirl of activity of soap molecules finding and bonding with fat molecules in the milk. With millions of molecules swirling around looking for mates, the colors in the milk get all mixed up! It looks like the milk is erupting for several seconds.

You may notice if you try this magic milk experiment once with whole milk and once with skim that the whole milk swirls for much longer because of the higher fat content in the milk .

If the kids want to repeat this artistic science experiment (they will) be sure to wash the dish out well with warm water and then pour in fresh milk to do it again. Once the milk is contaminated with soap it loses its “magic”.

More Science Activities and Ideas

Walking Water Science for Kids

Science Notebook

Oil and Water Science Activity

Want science planned for you ALL YEAR LONG?!

Do you want  science planned  for the  ENTIRE CALENDAR YEAR !? This  Endless Science Mega Bundle  will  save you so much time  and  keep your students engaged  and  excited about learning . This amazing resource contains  53 science topics  including  life science ,  physical science ,  earth science , and  animal studies .

Get Your Magic Milk Recording Sheet

cool magic milk experiment

You May Also Enjoy These Posts

A jar with different colored liquids layered on each other

Reader Interactions

12 comments.

' src=

July 22, 2020 at 6:44 pm

who is the author of this amazing website

' src=

April 24, 2022 at 2:22 pm

I was just looking for this info for a while. After six hours of continuous Googleing, finally I got it in your website. I wonder what is the lack of Google strategy that don’t rank this type of informative websites in top of the list. Normally the top websites are full of garbage.

[…] Magic Milk Experiment  […]

[…] Milk, oil and food colouring experiment […]

[…] Source: adabofgluewilldo.com […]

Leave a Comment Cancel reply

Your email address will not be published. Required fields are marked *

This site uses Akismet to reduce spam. Learn how your comment data is processed .

Messy Little Monster

  • arts & crafts
  • _famous artists
  • _process art
  • _paint recipes
  • _keepsake crafts
  • _book activities
  • _sensory bins
  • _sensory play recipes
  • _science experiments
  • _free printables
  • _colouring pages
  • _valentines day
  • _st patrick's day
  • _mother's day
  • _father's day
  • _thanksgiving

Magic Milk Fireworks Science Experiment

Magic milk fireworks science experiment for kids. Simple experiments for preschoolers upwards.

Magic milk experiment supplies:

  • Full fat milk 
  • Food colouring
  • Washing up liquid
  • Cotton buds (q tips) 
  • A dish with a flat bottom 

How to do the magic milk experiment

Magic milk fireworks science experiment for kids. bonfire night, new year, 4th July.  Suitable for eyfs, preschoolers upwards.

  • — Share It —

No comments

' height=

Hello & Welcome!

cool magic milk experiment

Follow By Email

Join the fun subscribe to our newsletter to have fun ideas delivered to your inbox subscribe.

cool magic milk experiment

Get FREE craft and activity ideas

Join our newsletter to have ideas delivered to your inbox each week!

There was an error submitting your subscription. Please try again.

Copyright Messy Little Monster . Blog design by Designs by Kassie . Privacy Policy Here

Babble Dabble Do

See Exploding Colors in the Magic Milk Experiment

February 25, 2022 by Ana Dziengel 24 Comments

See exploding bursts of color in the amazing magic milk experiment! We’ll show you some two ways to do the experiment and an extension idea for the project as well.

When you add a little bit of dish soap to milk and food coloring, the colors swirl around to form what I would deem very artistic and abstract paintings! For the science behind it scroll to the end of this post.

The magic milk science experiment is a simple science experiment you can do with everyday materials. I love showing kids how to do chemistry experiments using simple household supplies. In fact I would argue that some of the best at-home science experiments use kitchen ingredient s !

We did this project in our after school classes and when our students asked to “take it home” I told them they could easily recreate it in their own kitchen.

Video Overview

Detailed instructions for the magic milk experiment:, how to do the magic milk experiment, magic milk experiment materials.

  • Almond Milk or Cow’s Milk
  • Q-tips (Cotton Swab)
  • Cotton Balls
  • Food coloring
  • Shallow plate or wide bowls

Magic Milk Instructions: Method #1

  • Fill a plate or bowl with milk.
  • Drop in at least 2 drops of each of four colors of food coloring. The more variety of colors the cooler the painting.
  • Generously dip the end of a q-tip in dish soap.
  • Now dip the q-tip (cotton swab) into the milk next to a drop of color.
  • The first thing that will happen is the color will burst as soon as the dish soap hits it. It’s a great effect but very short lived. Once there is a little dishsoap in the milk it no longer “bursts”.
  • Gently swirl the q-tip through the different colors and you’ll see little rivers of color start to form.
  • Continue until the colors begin to mix and become brown. Empty your plate/bowl and repeat.

Magic Milk Experiment Instructions: Method # 2

Time needed:  10 minutes.

This version of the magic milk experiment lasts a long time, provided kids can restrain themselves from moving the cotton ball!

Pour a thin layer of milk in a plate or bowl.

Add a few drops each of food coloring on the center of the plate.

Soak a cotton ball in dish soap.

Carefully place the cotton ball in the center. The colors will explode out of the center!

Let the reaction continue until the colors begin to mix and become brown.

Tips & More

  • You don’t need that much milk! I vastly overestimated how much we would need. For a class of 25 kids we used 1 1/2 gallons of milk.
  • This is a great use of expired milk products. Put that small amount of whipping cream at the back of your refrigerator to use.
  • Kids love the magic aspect of this project. We called the cotton swabs “magic wands.”
  • Too much swishing and swirling and you’ll end up with brown muck fast. Of course kids don’t seem to care!

A word about food insecurity

We try to be respectful of the challenges children and families face including food insecurity. As an educator, I try to avoid using food in projects when possible. I make exceptions for projects that may have a lot to teach kids and where I feel we won’t be wasteful. That said, please think carefully about the population of students and families you serve before doing this project. Consider whether they would find this wasteful or offensive before proceeding. Also consider vegan families who may not want their children working with animal products; see some of the alternatives we suggest below.

Magic Milk Variations

  • Try Different Milk Types  We have used almond and cow’s milk for this experiment and both worked well. The higher the fat content of the milk the more pronounced the “explosions” should be. A fun experiment would be to compare the results with different types of milk: almond, cow, rice, coconut. You can also experiment with cream, whole milk, and skim milk to see if there is a difference.
  • Premix the soap and milk For a variation we premixed the milk and dish soap. You won’t have the color burst effect but it does seem to keep the colors separate a little longer.

The Science Behind the Magic Milk Experiment:

The dish soap molecules are attracted to the fat molecules in the milk. As soon as you introduce the soap to the milk/coloring mixture the molecules race around trying to bond. The food coloring gets pushed around in the process and appears to burst. Eventually the molecules all bond and the reaction stops.

This is a good example of how detergents work, their molecules have two ends: one end is attracted to oils and the other to water. One end of detergent molecules attracts oils and dirt from clothes, dishes etc., and as they stick together they break the oil and dirt down into smaller, easy to remove pieces.

How to Do the Magic Milk Experiment in the Classroom

If you would like to the magic milk experiment with a class full of kids here are step-by step instructions.

Per student Materials:

  • (1) Small Plate or other shallow dish (make sure these are waterproof)
  • (1) Large Plate or other shallow dish
  • Tray to put underneath

NOTE: You may also use a divided plate as pictured above.

T eacher’s Materials:

  • Milk 1.5 gallons per class of 25 students
  • Tubs to collect dishes in afterwards

Sh ared Materials:

  • Small bowl of dish soap
  • Q-tips (Cotton swabs)
  • Small bottles of liquid food coloring

Experiment #1 Procedure:

  • Pass out per student materials. Ask students to place the small plate in the center of the table. It will be used for the second experiment. Ask students to place the large plate in the center of their tray.
  • Explain the experiment first. Tell students they will be making colorful explosions using milk and food coloring and a “magic ingredient.” Tell students to use only a few drops of food coloring once it is available. Demonstrate how to carefully squeeze drops out of the food coloring bottles.
  • Teacher(s) pour a thin layer of milk in each plate.
  • Pass out the shared materials to each group of students.
  • Ask students to carefully drop several drops of food coloring in the milk around their plate. Remind them not to disturb the color.
  • When everyone has added color tell students to grab a “magic wand” AKA a Q-tip. Ask them to dip the wand into the magic ingredient (soap) but hold it to the side of the plate until everyone is ready. You can ask them if they know what the magic ingredient is.
  • Do a countdown and on the count of 3 student should dip their q-tip into one of the drops of color. Instruct students to continue dipping the q-tip into the other drops. Listen for the oohs and aahs!
  • When done the teacher should place the plates and milk in tubs to clean.

Experiment #2 Procedure:

  • Ask students to place the small plate in the center of their tray.
  • Teacher(s) pour a thin layer of milk in each small plate.
  • Ask students to carefully drop a good squeeze of three colors of food coloring near the center of their plate. Remind them not to disturb the color.
  • When everyone has added color tell students to dip a cotton ball in the soap.
  • Instruct students to place the cotton ball in the center of the plate and not move it. See video below. This is an exercise in restraint!
  • Watch as the color explodes out of the center of the plate/cotton ball.
View this post on Instagram A post shared by Ana from Babble Dabble Do (@babbledabbledo)

Turn the magic milk experiment into colorful paper!

Did you know you can expand on this experiment by making Marbled Milk Paper ?

Go HERE   for instructions: 

More Favorite Science Projects to Try:

Michelle - Little Paper Dog says

January 29, 2013 at 7:17 pm

So cool! I can’t wait to try this out with my little guy. 🙂

Ana Dziengel says

January 30, 2013 at 2:28 pm

Thanks Michelle! So simple and fun! BTW your blog is lovely! I particularly love that you have fast and easy projects; I’m trying to do something similar on my blog: quick, easy, simple projects using stuff you already have on hand.

Amanda Preiser says

April 18, 2013 at 5:06 am

This is awesome my daughter and I are going to do this today!

April 18, 2013 at 5:33 am

Thanks for stopping in Amanda! It’s a super fun and simple project. Enjoy!

August 21, 2014 at 11:08 am

Thanks! I’m an art teacher. There’s so many meet ideas I got from your blog. Thanks!

September 4, 2014 at 3:49 am

Linda, I’m thrilled to hear it! Thanks for stopping by 🙂

Denise says

August 23, 2014 at 1:45 pm

what type of paper did you use for the milk painting project?

September 4, 2014 at 3:51 am

Hi Denise, I used watercolor paper 🙂

Virginia says

January 3, 2015 at 12:34 pm

Did I miss something? I didn’t see directions for a little paper dog. I love this site. GREAT ideas Sorry if ? is dum! I can hardly wait to make the crystals. You know, Epsom salts have done ‘miracles’ ever since I knew of them! They were up front and most important in the “medicine cabinet” of my parents who had fifteen children, therefore many opportunities to use the salts for ‘injuries, localized infections and sore spots.’ Now I see they can add enormously to the decorations in my life as well as do almost magical “healing” Wish my Dad could see those! “What a Wonderful World!” Thank-you!

January 5, 2015 at 5:30 am

Thanks Virginia!

Rachel Holland says

February 7, 2015 at 9:57 am

I have tried this experiment out with my children today. I was really excited about it after seeing the lovely photo’s etc, however it was a bit of a flop. Tried it with Almond milk as suggested and semi skimmed cows milk, but when we put in the washing up liquid not much really happened. We changed the washing up liquid and got much better colour spread. However when it did the colours almost pretty much disappeared and trying to get paintings from them was so wishy washy. Are food colourings in the US very different to those in the UK, or do I just need to buy better colourings? I assumed that the liquid colourings from my local supermarket would be fine. I have also tried with gel colouring (which is the only thing that most stores stock) but this wasn’t particularly good either. I really want to make some lovely backings for Mother’s day cards etc but I am drawing a blank! Any help you could give would be great.

February 19, 2015 at 4:14 am

Hi Rachel, I’m sorry to hear this! Gel food coloring will not work. Regular food coloring should work fine. You will need to make the prints right away, if you wait until the colors are mixed you will get muddy results. And make sure you are using watercolor paper. I tried the project using cardstock and regular paper and they just didn’t absorb the color well. I hope this helps and please keep me posted!

J lewis says

February 19, 2017 at 10:09 am

Hello there, We used paste food colouring from cake shop, used to colour roll out icing, much better than the supermarket colours, which are useless for most things now as they have changed the formulas. Mix the colour paste with a little water to make a strong coloured liquid, we use this for colouring pasta too and play dough.

February 22, 2017 at 5:19 am

Thanks for the tip!

August 19, 2015 at 9:18 am

Was looking for the science explanation (chemical reactions) to share with the students while doing this? I like teaching the science of a science based experiment.

Neera Talukder says

October 25, 2015 at 6:56 am

can the whole milk be used as a substitute for almond milk ?

November 9, 2015 at 9:12 am

Absolutely!

Peggy Ashbrook says

November 30, 2015 at 4:27 am

I love it when you add the science concepts involved, both at an adult level to refresh our memories or learn new, and at a level appropriate for young children. Exploring the properties of art materials engages children in art and science!

August 16, 2016 at 5:13 am

Thanks so much Peggy!

Lisa Lewis says

January 21, 2016 at 8:07 am

I have tried the milk art 3 times with my grandchildren. We were very excited to watch the action of the colors in the milk but no much happened. I used whole milk, food colors, and Dawn dish soap. But once I put the drops of soap in the colors spread a little and then nothing else happened, I have read the posts and people talk about all the movement of the colors but we didn’t get that result. Am I doing something wrong?

August 16, 2016 at 4:51 am

Once the soap and fat molecules combine the reaction does stop. We like to swirl the milk using Q-tips after and watch the colors swirl.

Milton Garcia says

August 7, 2016 at 7:01 am

Messy. But I think my kids would love this activity.

August 15, 2016 at 8:06 am

They will love it!

Morgan says

August 23, 2016 at 12:22 pm

This looks like so much, and I love how it turns out. This would be a great project to take on with my four-year-old! Thanks so much for the idea!

Leave a Reply Cancel reply

Your email address will not be published. Required fields are marked *

Save my name, email, and website in this browser for the next time I comment.

Pin It on Pinterest

Childhood 101 logo - red trike and text.

Rainbow Magic Milk Science Experiment

Science or magic? This rainbow dancing Magic Milk Science Experiment is a fun way to explore the chemistry of surface tension.

This is one very cool experiment. To kids, it can appear more than a little magical but the effect is all science – no magic here. It’s a chemical reaction with surface tension in action! Check the explanation below the experiment procedure for more information about how and why the magic milk experiment works.

Magic Milk Experiment for Kids

You will need:

  • 1 Tablespoon dish soap/dishwashing liquid in a small container
  • 1 1/2 cups of whole/full fat milk
  • 10 drops of each of your chosen colours of liquid food colouring
  • Dinner plate
  • Cotton swab

Rainbow Magic Milk Experiment Supplies

1. Pour about one tablespoon of dish soap into a small container. Set aside.

Magic Milk Experiment

2. Carefully pour milk onto a dinner plate. It’s okay if you see bubbles in the milk. Let the milk sit for a minute so that it stops moving in the dish, becoming completely still.

Rainbow Milk Science Experiment

3. Drop food colouring into the milk in the middle of the dish. Keep the colours separate. The food colouring may spread out slightly as you can see pictured in our photos. You can get creative with where you place the drops and space them out how you wish.

We used neon food colouring for this activity, which looks really cool but you can stick with a classic colour palette or experiment with using just warm colours or cool colours.

Rainbow Milk Science

4. Dip a cotton swab into the dish soap.

Rainbow Magic Milk Science

5. Place the dipped cotton swab in the middle of a colour and observe the magical reaction! You should see the colours start to spread out towards the sides of the plate. They will continue to move and change over time.

Magic Milk Science Experiment

You can repeat this step a few times, placing the cotton swab in different areas of the milk/colouring mix.

Rainbow Science Experiment

Tip: Kids can also take their dipped cotton swab and “draw” or “swirl” in the food colouring. Eventually the colours will mix together until the milk becomes one color.

Rainbow Milk Experiment Procedure

If you allow the milk to sit a while before all colours are mixed completely together, you will see the milk continue to move and change in really neat ways, as you can see in the photos.

Milk Science Experiment Procedure

Watch over time how different things look!

Milk Science Experiment Ideas

6. When complete, dispose of milk in the sink.

The Science Behind the Magic Milk Experiment:

Milk as a liquid is composed primarily of water, with much smaller percentages of carbohydrate, fat, protein and vitamins/minerals. Milk composition does vary according to the species and breed of animal, the animal’s feed and the stage of lactation of the cow.

Because of its web of hydrogen bonds, water molecules are highly attracted to each other, resulting in a high surface tension.

When the dish soap is added to the milk the soap acts as a surfactant , reducing the surface tension of the milk so that the food colouring can spread out.

Surfactant (definition): substance such as a detergent that, when added to a liquid, reduces its surface tension, thereby increasing its spreading and wetting properties. (source: britannica.com)

At the same time, the phosphates in the dish soap are reacting with the fat and protein content of the milk – the soap is trying to grab the globules of fat out of the milk to break them down, just like dish soap breaks down the grease when washing up. This interaction causes the fat particles to move around, creating the resulting swirls of moving colour.

For more STEM fun involving magic and colour, be sure to check out our cool eResource – Rainbows & Kaleidoscopes: 25 STEAM Activities Exploring Colour (and Color!) .

Rainbow activities for kids

For fun, watch the magic milk experiment in action on a HUGE scale;

Density Experiment

Christie Burnett is a teacher, presenter, writer and the mother of two. She created Childhood 101 as a place for teachers and parents to access engaging, high quality learning ideas.

  • Skip to primary navigation
  • Skip to main content
  • Skip to primary sidebar
  • Skip to footer

Happy Hooligans

Crafts and Activities for Toddlers and Preschoolers to Tweens

Magic Milk Experiment – an Explosion of Colour

Last updated on February 1, 2019

  • Facebook 652
  • Pinterest 3.9K

The Magic Milk Experiment is such a cool way to teach kids about chemical reactions . You’ll set off an explosion of colour in a dish of milk, using just food colour and dish soap. The ever-changing waves of colour are fascinating to watch!

The magic milk experiment is one of those classic science activities  that’s been thrilling kids in classrooms and kitchens for years. If you’ve never tried it, you need to put it on your must-do list now.  It’s fun, quick, and easy, and kids of all ages (grown-ups too!) will find it fascinating!  Be warned though: you won’t just do it once.  If you’re like us, you’ll want to set those colours swirling, twirling and colliding over and over again!

Magic Milk Experiment - Happy Hooligans

To do the magic milk experiment, you’ll need:

milk-dish soap - food colouring

  • saucer or small plate
  • milk (we used 1%, but 2% or whole milk is said to work best)
  • liquid food colouring
  • dish soap (I believe any brand will work)

To make the colour explosion happen:

Pour enough milk to cover the bottom of the saucer.

Gently drip one drop of each of the colours of food colouring on to the surface of the milk.  Drop your colours close together near the center of the saucer.

Now, grab a Q-tip, and coat one end with a drop of dish soap.

dish soap on Q tip

Now for the magic!

Press the soapy end of the Q-tip into the food colouring, where the colours intersect.  Hold it steady, and watch what happens!

q-tip-dipped in milk and food colour

Keep it in place for 10 or 15 seconds, observing how the colours continue to stream out from the Q-tip.

IMG_6523 (1)

For fun, lift your Q-tip up, and press it down in another area of the plate where the colours have gathered.

Q-tip-food-colour-milk

Continue to move the Q-tip from one spot to the other, watching the colours swirl and churn and collide.

Magic Milk Food colouring science experiment

Try tipping and tilting the Q-tip to see what effect that has on the colours.

science with milk, dish soap and food colouring

Remove the Q-tip completely, and watch in amazement as the colours continue to spin, whirl and twirl.

Isn’t that just the coolest?  You want to do it again, don’t you!

swirls of food colour in milk making science come alive

How does it happen?

Head over to Steve Spangler Science to find what makes milk, dish soap and food colouring behave this way when they’re combined.

For more easy preschool science experiments, check out:

10-minute, homemade butter

Expanding Ivory Soap Experiment

Ocean in a Bottle

Turning Grapes into Raisins

Water Displacement Experiment

Get my latest e-book: Fizz, Pop, Bang! Playful Science and Math Activities

40 hands-on, learning activities for kids ages 3-8. Recipes, experiments, art projects, printables and play ideas with links to 80 activities not featured in the book. All for the low price of $9.99

Download your copy today :

1016903_877442015613168_1619796865503462472_n

Follow the Hooligans on Facebook

for FREE crafts, 

activities & recipes!

cool magic milk experiment

Jackie is a mom, wife, home daycare provider, and the creative spirit behind Happy Hooligans. She specializes in kids’ crafts and activities, easy recipes, and parenting. She began blogging in 2011, and today, Happy Hooligans inspires more than 2 million parents, caregivers and Early Years Professionals all over the globe.

Reader Interactions

June 3, 2018 at 8:54 pm

Hi! This looks amazing!! Do you know if there is something else that can be used in place of cow’s milk? We are dairy-free due to my son’s allergy. Do you know if coconut milk work work due to its fat content? We have soy and pea milk at home, but those are low in fat. Thanks for the great idea!

happyhooligans

June 4, 2018 at 3:36 pm

I’m not sure if it would work with a non-dairy substitute, Betty. You could certainly pour a little into a saucer to see if it would work. If it doesn’t, you might pick up a small lunch box sized carton of milk for the experiment. Unless, of course, there’s the danger that your son might ingest some.

April 10, 2023 at 3:43 pm

Oh my goodness! This looks like so much fun. I might have to give this a go with my nieces.

Leave a Reply Cancel reply

Your email address will not be published. Required fields are marked *

Save my name, email, and website in this browser for the next time I comment.

This site uses Akismet to reduce spam. Learn how your comment data is processed .

Join My Private Support Network!

cool magic milk experiment

Our Most Popular Posts

2 ingredient flat bread pin image

STEAM Powered Family

Color Explosion Magic Milk Experiment and Science Fair Project

Want an extremely fun, easy, inexpensive experiment with serious WOW factor? You’ve got it with this Color Explosion Magic Milk Experiment that let’s kids explore a fireworks explosion of rainbow colours that appear to move and change like magic! It’s not magic though, it’s science. This easy science experiment is a must do for all ages. Today we have taken things even deeper by developing an entire Science Fair Project around Magic Milk.

Magic Milk Science Experiment

What you will discover in this article!

Magic milk science fair project

Disclaimer: This article may contain commission or affiliate links. As an Amazon Influencer I earn from qualifying purchases. Not seeing our videos? Turn off any adblockers to ensure our video feed can be seen. Or visit our YouTube channel to see if the video has been uploaded there. We are slowly uploading our archives. Thanks!

With all the crazy experiments we have done around here, from launching baking soda and vinegar rockets, to building light up circuit bugs, to magic colour changing oobleck, sometimes it’s the simple experiments that surprise us the most! This Magic Milk experiment did exactly that.

With a very simple set up, and items from the kitchen, we ended up spending an entire afternoon experimenting, testing and learning. All with lots of mesmerized faces, quietly watching in awe what was happening in front of them.

Here’s the thing with Magic Milk experiments, they are extremely calming and relaxing to watch. It’s like a scientific calm down dish, instead of a calm down bottle. If you need an activity to keep the kids calmly entertained as they learn, this is it!

EASY SCIENCE EXPERIMENT – MAGIC MILK

The quick and easy way to do Magic Milk is to take your milk, whatever you have in your fridge should work (as we proved with our science fair project below), then you just need a pie plate or shallow dish, dish soap and food coloring.

Fill the dish with milk

Pour milk into the dish, we made ours about 2cm deep. We used a variety of milks in our science fair project below. You should be able to use whatever you have in the fridge. Let it settle for a moment, this will take more time the higher the fat content.

Add drops of food coloring

Scatter some drops of food coloring in the milk.

Add dish soap

Use a Q-tip or pipette to add a drop of dish soap to the center of the plate and watch what happens!

Color explosion magic milk experiment

MAGIC MILK SCIENCE FAIR PROJECT

The joy of having kids that have been raised to be creative, imaginative thinkers, who embrace the Scientific Method, is that they have so many amazing questions. Very quickly our Magic Milk Experiment became a Magic Milk Science Fair Project.

HOW DOES THE FAT CONTENT OF THE MILK AFFECT THE MAGIC MILK EXPERIMENT RESULTS?

That was the big question for our science fair project. We wanted to know if the fireworks of colors created by the dish soap in milk would change at all based on the type of milk or cream we used. Specifically we look at fat content.

RESEARCH INTO MAGIC MILK

Our research actually led us to some conflicting and confusing information about what exactly was happening during the Magic Milk experiment. Finally we found some concrete answers that made sense, especially once we did our experiments. Turns out the whole things is based on surface tension and the polarity of molecules. More on the science in a moment!

Resources on Magic Milk include Scientific American and American Chemical Society .

HYPOTHESIS: Higher Fat Content EQUALS SLOWER COLOR MOVEMENT

After doing our research, I pulled out the milks we had available. We were going to test 2% fat (milk), 18% fat (coffee cream) and 33% fat (whipping cream). I asked the kids to come up with their predictions and best educated guesses for what might happen. Their hypothesis was that the higher the milk fat content, the slower the colors would move through the milk.

HOW TO DO THE MAGIC MILK EXPERIMENT

Next we set up our experiments. Our constant variables were our Dawn dish soap applied in the middle of the plate with a Q-tip, milk 2 cm deep in a pie dish so the amount of milk was consistent, a consistent number of food coloring drops scattered in a similar pattern each time.

Our independent variable, the one thing we changed each time, was the fat content of our milk. We used 2%, 18% and 33%.

For our dependent variable we studied how the colors exploded and moved after the dish soap was added. We watched for changes in how fast colors exploded across the milk and if there were different patterns in how the colors moved. We also timed how long the colors continued to move.

Check out our Magic Milk Color Explosion Video!

Results of magic milk science fair experiment.

Our results were striking! The 2% milk rapidly exploded with colors that flew around the plate. In a short amount of time the colors started blending together and the dish soap, which stays as a little bubble, started floating around pushing reactions around the plate. The colors moved and blended about, constantly moving and changing. There was a lot of action with the rainbow of colors.

Magic milk experiment results in 2% milk

The 18% moved more slowly, the colors tended to stay together for a very long time without mixing. It also took a lot longer for the dish soap bubble to start moving around the plate.

Magic milk experiment with 18% coffee cream

Once it did start moving, slowly, it did start forcing more mixing of the colors. We found the colors pushed to the edges of the plate in a multi-colored ring.

This color blocking is very similar to what we saw in the Skittles Science Experiment . This made us wonder about the possibility of water stratification and concentration gradient playing a role in our results as well.

magic milk color explosion

33% gave us the most astonishing and amazing results. The colors spread in fractals. Branching out in short little bursts. Like leafless branches, that never mixed into the milk. The soap bubble did not move, staying anchored in the middle of the plate where we had placed it. Very minimal mixing of the colors occurred, only happening when two fractals accidentally crossed paths.

magic milk in 33% cream with color fractal explosions

With all three we stopped our stop watch at 15 minutes as the reactions and movement were still ongoing and, although they had slowed, they didn’t seem to be ending any time soon.

I mentioned earlier that when we were doing our research we came across from conflicting and even confusing information on the possible science behind magic milk. Our experiment allowed us to study how the fat content affected the movement of colours, allowing us to draw solid conclusions, informed by our research, into what exactly is happening.

Our hypothesis was correct, but our results lead to even more fascinating findings!

Conclusion – The Science Behind Magic Milk and Fat Content

With our Magic Milk Science Fair Project we were able to study the effect fat content had on the movement of colour when dish soap is added. Our results tell us that fat content plays a large role, but the reason may be surprising.

Liquids have something called surface tension. Water, milk, and cream are made up of molecules that have positive and negative charges on their surface. Just like magnets these charges allow them to attract and repel other molecules. When milk or cream is by itself, it’s molecules are surrounded by the same type of molecules, creating a nicely balanced push and pull. The exception is the top which is exposed to air which pushes down on the liquid, creating surface tension on the top of the liquid.

There is a substance that affects a liquid’s surface tension, it’s called a surfactant. Dish soap is mostly comprised of surfactants. It has a hydrophilic part that is attracted to the water and a hydrophobic part that wants to interact with the fat molecules and repels water.

It’s all about surface tension

The pushing and pulling of the fat and water molecules in the milk separates them, resulting in a decrease of the surface tension.

We see a big difference between our various fat content milks due to the different ratios of fat to water in the liquids. The higher fat content milk is much thicker. We can see this before adding the dish soap if we just look at the food colouring drops. The food colouring spreads significantly in 2%, spreads a little in 18% and doesn’t move at all in 33%.

This means, in our 33% milk, there is less water for the hydrophilic part to attract, and way too much fat for the hydrophobic part to ineract with. The surfactant (dish soap), has very limited effect on the surface tension, which remains quite a viscous, stable liquid. This leads to the fractal style, very limited spread of colour we see in the high fat milk.

color explosions fractal in magic milk

In the 2% milk we have lots of water and some fat, allowing the surface tension to be affected easily. This results in a dramatic dance of color.

FURTHER STUDIES IN MAGIC MILK

Already the kids have identified more testing we can do in the future. This includes testing different surfactants. They wonder how shampoo or soaps may affect our results. They also wondered if there would be a difference if we used a oil or gel color instead of liquid food coloring (which is mostly water).

The kids also want to test lower percentage milks like skim and 1%, plus other types of milk like soy, coconut, goat milk, etc. to see how the different types of milk react.

Magic Milk science fair project exploring the effect of fat content

MORE SCIENCE FAIR PROJECT IDEAS

Skittles Experiment for the Science Fair inspired by Starry Night

Magic Milk Experiment

Explore the magical and explosive colourful experiment that involves a reaction between milk and dish soap.

  • 1/2 – 1 cup milk experiment with different percentage fat milks and creams to see how it affects the results
  • 1 tsp dish soap
  • bottles food colouring in a variety of colours

Instructions

Pour milk into the shallow dish until it is about 1 to 2 cm deep. The amount of milk required will vary based on the size of your dish.

Add drops of food colouring to the milk.

Take the Q-Tip and dip it into the dish soap, then place the q-tip into the middle of the prepared milk and watch the reaction. You can remove the q-tip after a few seconds and the reaction will continue. The pattern of the reaction and duration will vary based on the fat content of your milk or cream. Experiment with a variety to see how your results change.

cool magic milk experiment

Usually, chemistry is something that we can’t see with the naked eye, and when we can, it usually ends in a big mess! As a parent, you can easily and cleanly set up a fun and beautiful chemistry experiment for your child, from pre-school to pre-teen, with four ingredients you have in your home. Magic Milk is an at-home STEM experiment that is not only cool to watch in action, it’s also a great art project that turns into a pretty display of science and creativity! 

Chemistry in Action

Unlike typical chemistry experiments that involve dangerous liquids and possible explosions, magic milk is really safe for kids (but they still should not eat it). This experiment shows us how the fats and water in milk interact with the dish soap. When the soap touches the milk, the fats separate from the water and the food coloring pops and swirls around.

Not only is this a cool science experiment, but it is also a beautiful work of art! Your kids can easily “paint” a masterpiece by manipulating the milk and food coloring with the dish soap. Remember that parental supervision is still required for younger children, but this experiment should be easy enough to do for all school-aged kids.

  • Full-fat or 2% milk
  • Food coloring (however many colors you want)
  • Cotton swabs
  • Shallow baking dish
  • Pour the milk into a shallow dish until the bottom is fully covered and then some.
  • Add drops of food coloring in any arrangement you like with as many colors your kids want to see.
  • Coat the cotton swab with the dish soap. You can either remove the cap from the soap or pour some into a small cup or bowl to dip the swab into.
  • Gently touch the food color in the milk with the soap-dipped swab. Watch as the color quickly displaces and spreads all over the milk.
  • Continue steps 3 and 4 to create a beautiful kaleidoscope in the milk.
  • Snap a pic and share it on social media, tagging @ivyleagueafterschool and #ivyleaguekids on Instagram or Facebook!

Test It Out

There are several variables you can change in this experiment to discover the different ways the fats, proteins and water interact in the milk. 

  • Use different types of milk. Whole milk works best because of the high fat content but you can test 2%, low-fat milk or skim milk to see how they all react to the dish soap. 
  • Test different brands of dish soap to see which displaces the milk best. Use your good soap on one half and bargain brand on the next to compare their effectiveness.

Your kids will love this hybrid chemistry experiment and art project. You can even take this outside to avoid any messes that may happen inside. Don’t forget to show off your working using #ivyleaguekids on Facebook and Instagram!

Get Your ALL ACCESS Shop Pass here →

Little bins for little hands logo

Santa’s Magic Milk Experiment

We all know Santa loves his milk and cookies and of course, he would have to have magic milk for Christmas! Explore the magic of Christmas with a magical science experiment.  Christmas magic milk experiment is perfect for our 25 Days to Christmas Countdown because it’s simple and fun to do!

We all know Santa loves his milk and cookies and of course he would have to have magic milk for Christmas! Explore the magic of Christmas with a magical science experiment. Christmas magic milk science is perfect for our 25 Days of Christmas STEM Countdown Calendar this year because it's simple and fun to do! Please join us in our countdown this season and follow along with great science and STEM for kids.

SIMPLE CHRISTMAS STEM ACTIVITIES

We all know Santa is full of magic, wonder, and really cool things right? Santa’s milk must be magic too! You need only a few simple supplies that are probably already in your kitchen to try out this fun  Christmas science experiment.

Our Magic Milk experiment is a classic science activity and a super fun family activity to try together. Kids of all ages {including adults} think it’s pretty cool. Just ask my husband!

GRAB THE CHRISTMAS STEM COUNTDOWN PACK HERE!

cool magic milk experiment

SANTA’S MAGIC MILK EXPERIMENT

  • Dawn Dish Soap
  • Shallow Bowl or Ramekins (dollar store plastic ones are great for lots of experiments)
  • Food Coloring
  • Cotton Swabs (Q-tips)
  • Christmas Cookie Cutter (optional)

Santa's magic milk supplies

STEP 1. To set up for your Christmas magic milk science activity , I used a small salad plate and a cookie-cutter. You can use a shallow dish or bowl of any kind. Fill whatever you are going to use with whole milk.

RELATED: Christmas Science Activities for Kids

Christmas Magic Milk Science Activity

STEP 2. Use your liquid food coloring to place drops of color all around the surface of the milk. Since we have a Christmas theme going, I opted for red and green colors. Use them all if you want! You can see our original magic milk science here .

STEP 3. Dip a cotton swab in dish soap. Touch the tip of the swab to the milk and watch! It’s like a little explosion. Or you could say it’s Magic Christmas Milk!

Christmas Magic Milk for Santa Science

HOW DOES MAGIC MILK WORK?

A larger surface area will allow for more magic to happen! The science behind it:  The chemistry of the dish soap and the fat of the milk is what makes the magic happen. While some of the dish soap’s properties dissolve in the water, the other properties search out the fat of the milk.

This “searching” is a whole bunch of molecules racing around to get those fat globs. You can see it with the color movement. Keep getting a bit more soap until there is no more movement. That means all the fat globs have been found and attached.

Christmas Magic Milk Science with Dishsoap

Turns into a beautiful Christmas magic milk star design. Now try it on the outside of the star!

Christmas Magic Milk Science Using Cookie Cutters

It’s really a very cool science experiment. Try not to stir rather just dip the cotton swab and let the magic happen. However, with that being said, my son was quick to stir. Science for young kids is all about experimenting anyway.

RELATED POST: Erupting Volcano Ornaments

Experimenting with Christmas Magic Milk Science

Once you have used up the “magic” or fat globs, give it a gentle stir to make a pretty pattern. Quite similar to a fancy coffee don’t you think? Kitchen science is right at your fingertips and takes so little effort to set up.

I am pretty sure your kids will ask to make Christmas magic milk again so grab some more dishes!

Santa Science and Christmas Magic Milk Science

My son did enjoy blowing the colors around too. Sometimes kids have to test out their own ideas whether we think they are right or wrong or already know the outcome. This is how kids learns, so let them blow and stir the milk and then try again and again.

Please don’t drink the milk!

Christmas Magic Milk Science Activity for Kids

When you are finished pour some nice fresh glasses of non-magic milk and enjoy a few cookies! Add our fun Santa’s Rocket Challenge to this classic milk science activity too!

cool magic milk experiment

MORE FUN CHRISTMAS EXPERIMENTS

Enjoy christmas magic milk this holiday season.

Click on the photo below for awesome Christmas science experiments all season long!

Fun and simple BEST Christmas Science Activities for kids to do this holiday season.

10 Comments

  • Pingback: Christmas Science - Grow the Grinch's Heart - Creative Family Fun
  • Pingback: Fun Santa Claus Crafts, Activities and Printables for Kids -

I did this expirament last year with my daughter and it was so awesome! I loved it so much that i put it in our Christmas countdown activites. However, this year it didn’t work! Is there a reason why?

  • Pingback: Ten Winter Holiday Makerspace Ideas – The Tinkering Librarian

Did you use a different type of milk? Dish soap?

  • Pingback: Magic Milk Classic Science Experiment Kids Science
  • Pingback: 25 of the Best Christmas Science Experiments for Kids
  • Pingback: Try This Magic Milk Experiment with Santa’s Milk – Site Title

Do you have a PDF of these directions available? I would love to print out the directions to save in my file for future years! 🙂

Hi Cori, You can find the complete instructions for all of our Christmas theme science in our Christmas STEM Pack. https://little-bins-for-little-hands.myshopify.com/products/christmas-stem-pack

Comments are closed.

cool magic milk experiment

Subscribe to receive a free 5-Day STEM Challenge Guide

~ projects to try now ~.

cool magic milk experiment

IMAGES

  1. Magic-Milk-STEM-Science-Experiment

    cool magic milk experiment

  2. The Magic Milk Experiment is SO cool & easy... here's how it's done

    cool magic milk experiment

  3. Magic Milk Science Experiment

    cool magic milk experiment

  4. Color Changing Milk Experiment

    cool magic milk experiment

  5. Magic Milk Experiment

    cool magic milk experiment

  6. Magic Milk Experiment

    cool magic milk experiment

VIDEO

  1. Magic milk experiment with Maureen

  2. THÍ NGHIỆM VỚI SỮA

  3. The magic milk experiment

  4. Magic Milk! 2 Ways to Do This Fun Science Experiment

COMMENTS

  1. Magic Milk Science Experiment

    Magic Milk Experiment Instructions. Step 1 - Pour some milk into a shallow dish or bowl until the milk covers the bottom. Step 2 - Add some drops of food coloring on the milk. You can use a variety of colors, just be sure to add 3-4 drops of each color. Step 3 - Add a drop of dish soap into the center of the milk.

  2. Magic Milk Science Experiment

    Magic milk is a cool science experiment for kids of all ages! Learn how different molecules in milk interact with soap! Magic milk is a cool science experiment for kids of all ages! ... This magic milk experiment has to be one of our favorites and definitely for science experiments with milk! Kids are naturally curious, and sharing fun, simple ...

  3. Cool Magic Milk Experiment You Have to Try

    Pour milk onto a plate. (It's ok if you see bubbles.) Drip a few drops of food coloring of choice in the center of the milk. You can get creative with where you drop the drops and space them out how you wish. (Note: Food coloring may spread out slightly as pictured.) Dip a cotton swab into the dish soap.

  4. Color Changing Milk Experiment

    Color-Changing Milk Experiment. This magic milk experiment is guaranteed to become one of your favorite kitchen chemistry experiments. Some very unusual interactions take place when you mix a little milk, a bit of food coloring and a drop of liquid soap. Use this experiment to amaze your friends and uncover the amazing scientific secrets of soap.

  5. Magic Milk Experiment: How-To Plus Free Worksheet

    Magic milk experiment steps: 1. Pour milk into a shallow dish or bowl, just enough to cover the bottom. 2. Add drops of food coloring all over the surface of the milk. 3. Dip the end of a cotton swab into a separate dish of blue soap. 4.

  6. Magic Milk STEM Experiment: Colorful Science for Kids

    The "Magic Milk" experiment combines the principles of chemistry and color theory to create a visually appealing and fun learning experience. Magic Milk is a simple, inexpensive, and safe STEM activity that kids of all ages can enjoy! Whole milk, food coloring, and a bit of dish soap come together to show children a magical explosion of colors.

  7. Magic Milk Science Experiment for Kids

    The magic milk science experiment is a fun way for kids to explore color and learn about what detergents do. Nothing happens if you drip food coloring onto milk, but once you add a drop of dishwashing liquid, the milk turns into a swirling wheel of color. Here's how to perform the magic milk science experiment and a look at how it works.

  8. Magic Milk Science Experiment

    Magic Milk Science Experiment. You will need -. plate. 1/2 cup - 1 cup milk. 1 drop of dishwashing liquid. food colouring. toothpicks (optional) This science experiment is simple to set up and quickly gets to the 'wow factor' that will bring a smile to your child's face. Simply begin by pouring milk onto a plate.

  9. Magic Milk Science Experiment for Kids

    1. Pour a glass of milk onto a plate. You'll need a wide, shallow dish for this simple science experiment. A plate, which allows for a thin layer of milk is perfect for watching the color explosion that is about to happen. 2. Add drops of food coloring. I added a variety of colors to my milk.

  10. Magic Milk Science Experiment

    This science experiment only requires a few common kitchen supplies: Milk (we used whole milk) Casserole dish, baking pan, or plate. Food coloring. Liquid dish soap (make sure it is NOT antibacterial) Magic Milk Printable. Print out a couple of copies of the free printable worksheet available below so the kids could keep track of their results ...

  11. Magic Milk Fireworks Science Experiment

    How to do the magic milk experiment. STEP 1: Pour full fat milk into the bottom of a dish (enough to just cover the bottom). STEP 2: Add small drops of food colouring to the milk. STEP 3: Dip your cotton bud into washing up liquid and then into the milk (hold it still). Watch as the colours quickly dart away from the washing up liquid and start ...

  12. See Exploding Colors in the Magic Milk Experiment

    Magic Milk Instructions: Method #1. Fill a plate or bowl with milk. Drop in at least 2 drops of each of four colors of food coloring. The more variety of colors the cooler the painting. Generously dip the end of a q-tip in dish soap. Now dip the q-tip (cotton swab) into the milk next to a drop of color.

  13. Rainbow Magic Milk Science Experiment

    Experiment procedure: 1. Pour about one tablespoon of dish soap into a small container. Set aside. 2. Carefully pour milk onto a dinner plate. It's okay if you see bubbles in the milk. Let the milk sit for a minute so that it stops moving in the dish, becoming completely still. 3.

  14. Magic Milk Experiment Explosion of Colour

    The Magic Milk Experiment is such a cool way to teach kids about chemical reactions. You'll set off an explosion of colour in a dish of milk, using just food colour and dish soap. ... The magic milk experiment is one of those classic science activities that's been thrilling kids in classrooms and kitchens for years. If you've never tried ...

  15. Color Changing Milk Experiment

    This magic milk science project gets it's burst of color from chemistry… Milk contains water, fats, proteins, and other substances. The fat molecules in the milk are key to the experiment. The surface of the milk has a property called surface tension, which is like an invisible layer that holds the molecules together.

  16. Color Explosion Magic Milk Experiment and Science Fair Project

    Fill the dish with milk. Pour milk into the dish, we made ours about 2cm deep. We used a variety of milks in our science fair project below. You should be able to use whatever you have in the fridge. Let it settle for a moment, this will take more time the higher the fat content.

  17. Magic Milk Science Experiment

    Magic milk is a super cool chemistry experiment for kids! One of the best science activities for kids and makes a great STEAM activity too. https://littlebin...

  18. STEM at Home: Magic Milk Experiment

    Magic Milk is an at-home STEM experiment that is not only cool to watch in action, it's also a great art project that turns into a pretty display of science and creativity! Chemistry in Action Unlike typical chemistry experiments that involve dangerous liquids and possible explosions, magic milk is really safe for kids (but they still should ...

  19. Magic Milk Science Experiment

    Sign up for Cool Science Experiments FREE Weekly Newsletter: http://coolscienceexperimentshq.com/subscribeTo find even more cool science experiments visit: h...

  20. Magic Milk Experiment for kids

    Magic Milk Experiment Steps. What we like about this color changing milk experiment is that it will fascinate everyone from young kids to adults. Step 1. Start by pouring the milk in your recipient. You should only aim at covering the bottom of your recipient or plate to not waste the milk. Step 2. Then add drops of the different food coloring ...

  21. Valentines Day Magic Milk Experiment

    This magic milk science project is always a favorite and is so easy to change up with seasons, holidays, and special days! Valentine's Day Magic Milk is a simple twist on a classic science experiment the kids always enjoy! Explore Valentines Day science with a Valentine's Magic Milk science experiment and enjoy an explosion of color!

  22. Santa's Magic Milk Experiment

    RELATED: Christmas Science Activities for Kids. STEP 2. Use your liquid food coloring to place drops of color all around the surface of the milk. Since we have a Christmas theme going, I opted for red and green colors. Use them all if you want! You can see our original magic milk science here. STEP 3. Dip a cotton swab in dish soap.

  23. Fun and Easy Magic Milk Experiment for Kids

    Amaze your kids with this fun and easy magic milk experiment. Watch as the colors swirl and create mesmerizing patterns. Try it today and spark their curiosity!